
Introduction:
We will learn how to implement Toast Messages/ Notifications in an Angular application using Bootstrap UI components in this Angular Bootstrap tutorial.
Bootstrap is popular among developers because of its ready-made, tried-and-true UI components, which not only speed up development but also match industry standards.
NgBootstrap provides practically all Bootstrap UI components for the Angular project, which we can quickly install and configure to use Bootstrap components.
We’ll start with new Angular project and learn how to install ng-bootstrap so that we can use Toast UI components with different configuration options attributes to change their design and functionality.
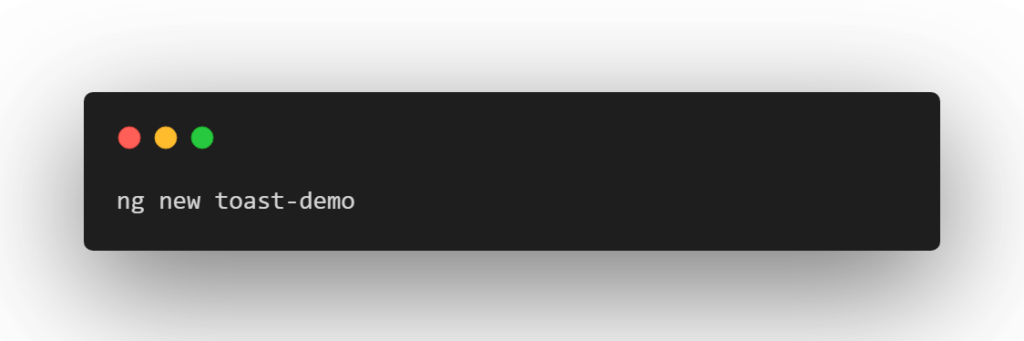
Step 1: Create new Project
Run following NPM command in terminal to create a new Angular project.
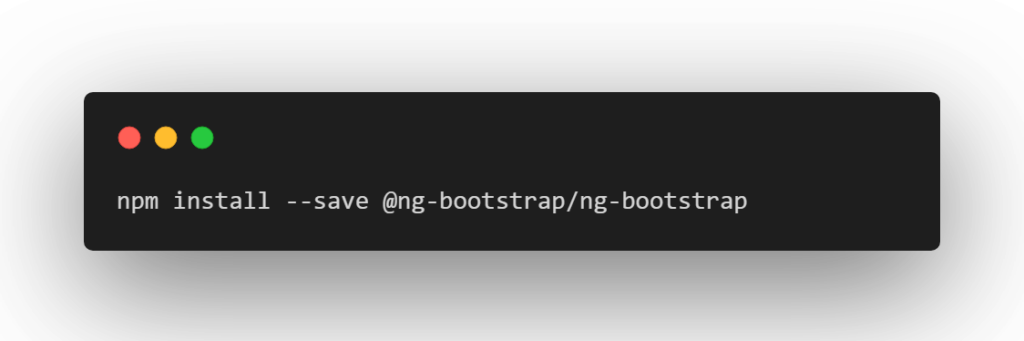
Step 2: Install ng-bootstrap
After successfully creating the project, run following NPM command to install the ng-bootstrap package in the Angular project.
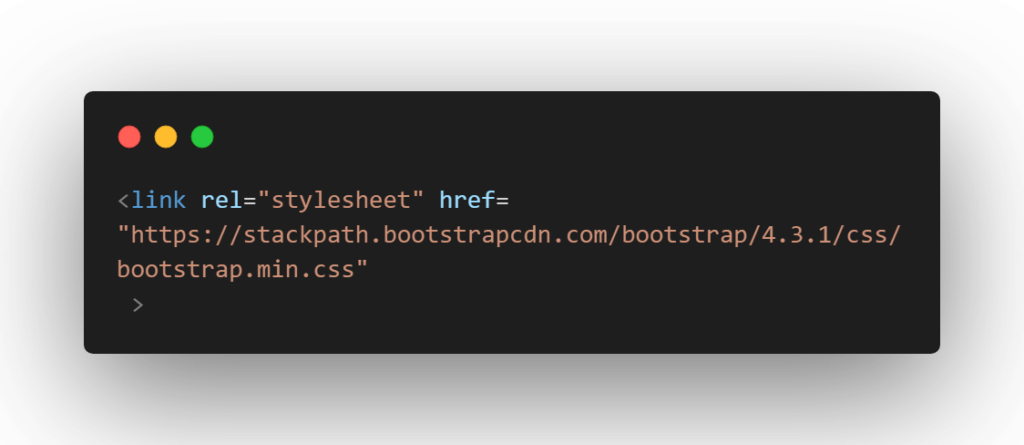
The ng-bootstrap includes UI components only, so for adding styling to these components we need to include CSS styling file in the index.html at Angular project root.
Step 3: Update App Module
now import FormsModule & NgbModule in app.module.ts file.
import { BrowserModule } from '@angular/platform-browser';
import { NgModule } from '@angular/core';

import { AppRoutingModule } from './app-routing.module';
import { AppComponent } from './app.component';

import { NgbModule } from '@ng-bootstrap/ng-bootstrap';

@NgModule({
  declarations: [
    AppComponent
  ],
  imports: [
    BrowserModule,
    AppRoutingModule,
    NgbModule
  ],
  providers: [],
  bootstrap: [AppComponent]
})
export class AppModule { }
Stpe:4 Create Toast Service
We will keep an array of toast notifications for the application, and in our toast service, we will push new toast messages into that array with the appropriate configuration.
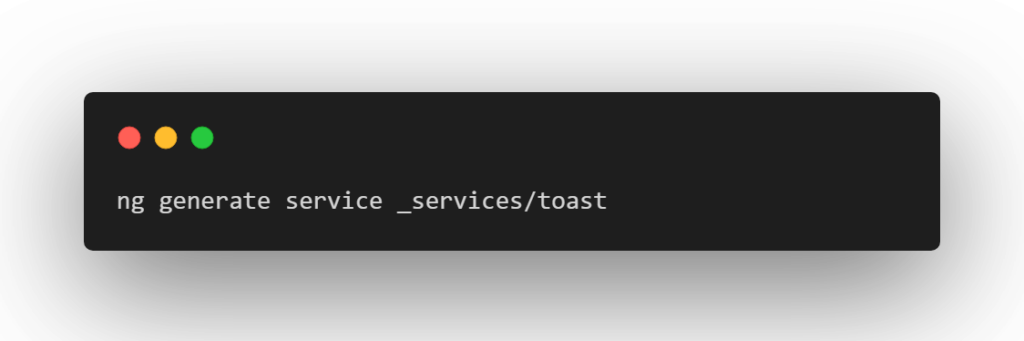
Create toast service by running following command.
Ater that copy the following code & paste it in toast.service.ts file
import { Injectable, TemplateRef  } from '@angular/core';

@Injectable({
  providedIn: 'root'
})
export class ToastService {

  toasts: any[] = [];

  show(textOrTpl: string | TemplateRef<any>, options: any = {}) {
    this.toasts.push({ textOrTpl, ...options });
  }

  remove(toast) {
    this.toasts = this.toasts.filter(t => t !== toast);
  }
}
Step 5 : Create Toast Component
We will make a toast component with the ngb-toast directive to iterate through the notifications in the service toast array in order to display toast notifications.
Now create toast component & place the following code to toast.component.ts file.
import { Component } from '@angular/core';

@Component({
  selector: 'app-root',
  templateUrl: './toast.component.html',
  styleUrls: ['./toast.component.css']
})
export class ToastComponent {

      constructor(public toastService: ToastService) {}

      isTemplate(toast) { return toast.textOrTpl instanceof TemplateRef; }
}
toast.component.html
<ngb-toast
    *ngFor="let toast of toastService.toasts"
    [header]="toast.headertext"
    [class]="toast.classname"
    [autohide]="toast.autohide"
    [delay]="toast.delay || 5000"
    (hide)="toastService.remove(toast)"
  >
    <ng-template [ngIf]="isTemplate(toast)" [ngIfElse]="text">
      <ng-template [ngTemplateOutlet]="toast.textOrTpl"></ng-template>
    </ng-template>

    <ng-template #text>{{ toast.textOrTpl }}</ng-template>
  </ngb-toast>
There are some properties of ng-toast:
autohide : Auto-hide the toast after a delay in ms. default: true
delay : Delay after which the toast will hide (ms). default: 500 (ms)
header : Text to be used as toast’s header.
Step 6 : Use Toast Service & Component
Open app.component.ts file and add the following template reference after router-outlet.

Now we will import toast service in app.component.ts file.
// app.component.ts
import { Component } from '@angular/core';

import { ToastService } from './_services/toast.service';

@Component({
  selector: 'app-root',
  templateUrl: './app.component.html',
  styleUrls: ['./app.component.css']
})
export class AppComponent {
  title = 'ng-bootstrap-demo';

  constructor(
    public toastService: ToastService
  ) {}

  showStandard() {
    this.toastService.show('This is standard toast', {
      delay: 2000,
      autohide: true
    });
  }

  showSuccess() {
    this.toastService.show('This is success toast', {
      classname: 'bg-success text-light',
      delay: 2000 ,
      autohide: true,
      headertext: 'Toast Header'
    });
  }
  showError() {
    this.toastService.show('This is error toast', {
      classname: 'bg-danger text-light',
      delay: 2000 ,
      autohide: true,
      headertext: 'Error!!!'
    });
  }
}
To call these methods and add the toast template, update following code in app.component.html.
<button class="btn btn-primary" (click)="showStandard()" >Standard toast</button> <button class="btn btn-success" (click)="showSuccess()" >Success toast</button> <button class="btn btn-danger" (click)="showError()" >Error toast</button> <ng-template #customTpl> <i>This is</i> a <u>custome</u> template <b>toast message</b> </ng-template> <router-outlet></router-outlet> <app-toasts></app-toasts>
Now run the application with npm start command.
OUTPUT:
