
In this article, I’ll walk you through the step-by-step process of establishing an Angular application, enabling Docker, producing images, and running them on Kubernetes.
Prerequisites
- Basic Understanding of Cloud.
- Basic Understanding of Docker.
Open the Visual Studio Code
1. Create the new Directory at a particular location
mkdir WebAPP
2. Go inside the WebAPP Directory
cd .\WebAPP\
3. Install the Angular CLI inside that.
npm install -g @angular/cli
4. After Installing Angular CLI, Create the new Angular Project.
ng new WebApp

5. Later on go inside your newly created app and run your Angular Application.
ng serve
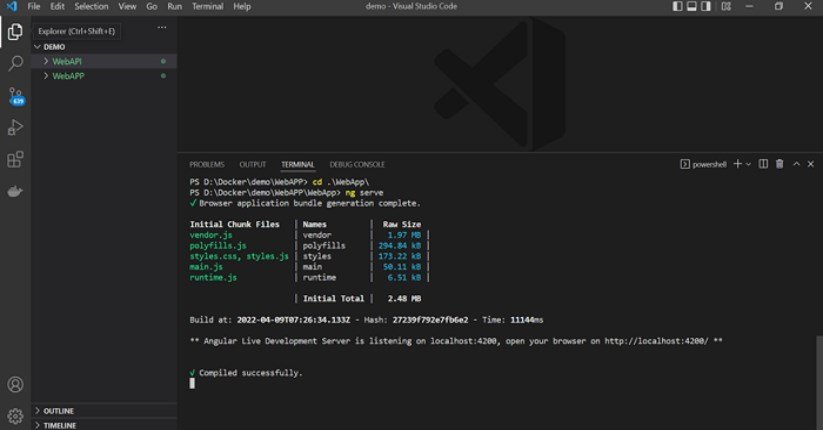
Here you will see your application is in the running mode now

We will now use Docker to run this application. Due to that,
The Dockerfile must first be created in the root directory of our Angular application without having any extensions defined.

As you can see, I ran our application inside a Docker container using the node alpine image, setting the app directory as the default working directory before copying package.json from the local system into that directory. The npm install program installs the necessary packages and dependencies for our angular application after that run. Once the app directory’s contents have been copied, run the npn run command to create the application for the production environment. Next, use the Nginx server image to run the application in a Docker container and control things like load balancing, reverse proxy, and routing.
As we build our image using the docker file, we now generate the.dockerignore file to remove some data.

In order to run our application in a Docker container, we must first construct a Docker image of it. So there you go.
2. Open the command prompt and run the following command
ng serve build –prod
Using this will produce the dist folder, which is needed when deploying our program in a real-world setting.
3. Build the docker image.
docker build -t web-app .
Here, we included the name of the docker image “webapp” and added a dot to denote the location of our application’s current directory.

4. Finally now we are going to run our image in the docker container
docker run — publish 4200:80 — name webappcontainer web-app
Here, we may set the application port to 4200 and the default container port to 80, with the container name and image name appearing next to those settings.


You may view the status of your application’s Docker container execution here.
Kubernetes
- For managing their own microservices across many clusters, Google built the container management orchestration tool known as Kubernetes.
- The Numeronym Standard, commonly known as Kubernetes or K8s, has been in use since the 1980s. For instance, there are 8 words between the letters K and S in the K8s.
- The Borg and Omega internal systems that Google developed are used to orchestrate the data center.
- Google released Kubernetes as an open source project in 2014; it was created in the Golang programming language. Donated later to CNCF.
- A program called Kubernetes automates the deployment of containers, load balancing, and auto-scaling. All of the containers running in various settings will be managed by it.
Now that this application will be executed on Kubernetes, we will enable Kubernetes in Docker Desktop as seen below.

We build a manifest file afterwards. In essence, it is used for configuration and can take the form of YML or JSON. We mentioned settings pertaining to various objects and how they will be connected to one another. The Manifest File contains a variety of items, including information on the number of pods, services, deployment, and ingress controllers that are needed to execute the application.
apiVersion: apps/v1
kind: Deployment
metadata:
  name: webapp
  labels:
    app: product-app
spec:
  replicas: 2
  selector:
    matchLabels:
      service: webapp
  template:
    metadata:
      labels:
        app: product-app
        service: webapp
    spec:
      containers:
        - name: webappcontainer
          image: webapp:v1
          ports:
            - containerPort: 80
              protocol: TCP
          env:
            - name: API_LINK
              value: http://localhost:30991
---
apiVersion: v1
kind: Service
metadata:
  name: webappservice
  labels:
    app: product-app
    service: webapp
spec:
  type: NodePort
  ports:
    - port: 8080
      targetPort : 80
      protocol: TCP
  selector:
    service: webapp
Therefore, in this area of the manifest file, we mentioned the deployment and service sections and configured the settings for pods, services, ports, Docker images, and containers.
Also, one thing I want to mentioned here
env:
           - name: API_LINK
             value: http://localhost:30991
This section is contained in the YML file and is used to specify the backend application API URL to fetch the data. If you only want to run a straightforward angular application, ignore and remove this section; instead, see my blog post about how dynamically we set API URL.
Next, we are going to apply Manifest YAML File using kubectl Kubernetes
kubectl apply -f manifest.yml

You can see that our service is currently accessible at http://localhost:30293 and is currently running on Port 30293.

Use the following commands to get more information about pods, services, endpoints, deployments, and the Kubernetes environment.

You can use any of the available commands, which are used to scale containers and similar things, according to the needs of your project.
So the main focus of this article is on containerizing Angular applications with Docker and Kubernetes.
I hope you comprehend the concepts behind Docker.