
In this article, we will learn how to login with Facebook in ASP.NET Core Identity
Create a new App
- Navigate to https://developers.facebook.com/apps/ and sign in using your Facebook account.
- If you do not have a Facebook account, you need to create one. You cannot proceed without a Facebook account.
- Once you have logged in, you will be redirected to a page similar to the one shown below.

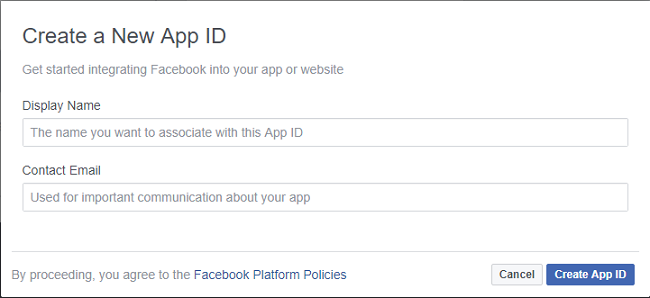
Click on Create a New App button on the top right corner. It will open a Create a New App ID form similar to the one shown below.
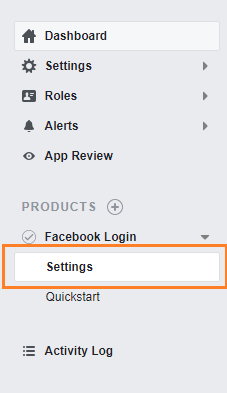
A Quick Start wizard will be launched asking you to select platform for the app. Skip this wizard and click on Facebook Login > Settings from the navigation menu on the left.
This will take you to the Client OAuth Settings page. In the Valid OAuth redirect URIs field enter the base URL of your application with /signin-facebook appended to it. For this tutorial the URL will be http://localhost:54575/signin-facebook. Click on Save Changes. Refer to the image below.

Now click on Settings > Basic on the navigation menu. You will see the App ID and App Secret values for the Facebook app we have just created. Click on show button inside App secret field to see the value. Take a note of both values as we will need them to configure Facebook authentication in our web app.

Now Create ASP.NET Core Identity Project
First you need to install the package called Microsoft.AspNetCore.Authentication.Facebook from NuGet.
Next, go to your Startup.cs file, and inside it’s ConfigureServices() method, set up the Facebook Authentication Service and provide the OAuth credentials you got from the Facebook Project before.
public void ConfigureServices(IServiceCollection services)
{
    services.AddDbContext<AppIdentityDbContext>(options => options.UseSqlServer(Configuration["ConnectionStrings:DefaultConnection"]));
    services.AddIdentity<AppUser, IdentityRole>().AddEntityFrameworkStores<AppIdentityDbContext>().AddDefaultTokenProviders();

    services.AddAuthentication()
    .AddFacebook(facebookOptions =>
    {
        facebookOptions.AppId = "Your Client Id";
        facebookOptions.AppSecret = "Your Client Secret";
        facebookOptions.Scope.Add("email");
    });

    services.AddControllersWithViews();
}
View Page
@model Login

<h1 class="bg-info text-white">Login</h1>
<div class="text-danger" asp-validation-summary="All"></div>

<form asp-action="Login" method="post">
    <input type="hidden" asp-for="ReturnUrl" />
    <div class="form-group">
        <label asp-for="Email"></label>
        <input asp-for="Email" class="form-control" />
    </div>
    <div class="form-group">
        <label asp-for="Password"></label>
        <input asp-for="Password" class="form-control" />
    </div>
    <button class="btn btn-primary" type="submit">Log In</button>
    <a class="btn btn-info" asp-action="FacebookLogin">Log In With Facebook</a>
</form>
The new link targets the FacebookLogin action on the Account controller. You can see this action along with the changes I made to the Account controller (code is given below). Basically I added 2 method which are FacebookLogin & FacebookResponse.
using Microsoft.AspNetCore.Mvc;
using Microsoft.AspNetCore.Authorization;
using Microsoft.AspNetCore.Identity;
using Identity.Models;
using System.Threading.Tasks;
using System.Security.Claims;

namespace Identity.Controllers
{
    public class AccountController : Controller
    {
        private UserManager<AppUser> userManager;
        private SignInManager<AppUser> signInManager;

        public AccountController(UserManager<AppUser> userMgr, SignInManager<AppUser> signinMgr)
        {
            userManager = userMgr;
            signInManager = signinMgr;
        }

        // other methods

        public IActionResult AccessDenied()
        {
            return View();
        }

        [AllowAnonymous]
        public IActionResult FacebookLogin()
        {
            string redirectUrl = Url.Action("FacebookResponse", "Account");
            var properties = signInManager.ConfigureExternalAuthenticationProperties("Facebook", redirectUrl);
            return new ChallengeResult("Facebook", properties);
        }

        [AllowAnonymous]
        public async Task<IActionResult> FacebookResponse()
        {
            ExternalLoginInfo info = await signInManager.GetExternalLoginInfoAsync();
            if (info == null)
                return RedirectToAction(nameof(Login));

            var result = await signInManager.ExternalLoginSignInAsync(info.LoginProvider, info.ProviderKey, false);
            string[] userInfo = { info.Principal.FindFirst(ClaimTypes.Name).Value, info.Principal.FindFirst(ClaimTypes.Email).Value };
            if (result.Succeeded)
                return View(userInfo);
            else
            {
                AppUser user = new AppUser
                {
                    Email = info.Principal.FindFirst(ClaimTypes.Email).Value,
                    UserName = info.Principal.FindFirst(ClaimTypes.Email).Value
                };

                IdentityResult identResult = await userManager.CreateAsync(user);
                if (identResult.Succeeded)
                {
                    identResult = await userManager.AddLoginAsync(user, info);
                    if (identResult.Succeeded)
                    {
                        await signInManager.SignInAsync(user, false);
                        return View(userInfo);
                    }
                }
                return AccessDenied();
            }
        }
    }
}
OutPut:

